Hi friends, in this post, we will be discussing about, how you can remove a saved Skype for Business password in Windows.
Why Removing a Saved Skype for Business Password?
Removing a saved Skype for Business Password is a completely optional thing to do.
There will might be scenarios, where you do not want the password to remained saved.
For example, you might have been using Skype for Business on a shared computer and you do not want the password to remain saved on the computer, since someone else might use the computer.
To this end, in case where you want to remove your saved Skype for Business password from your Windows computer, you can try the below steps.
Important Note: A critical thing to take into consideration prior to removing the saved password, is to first ensure that you indeed remember your password and in case you do not remember it, to take the necessary actions for recovering the password.
Step 1: Windows Credential Manager
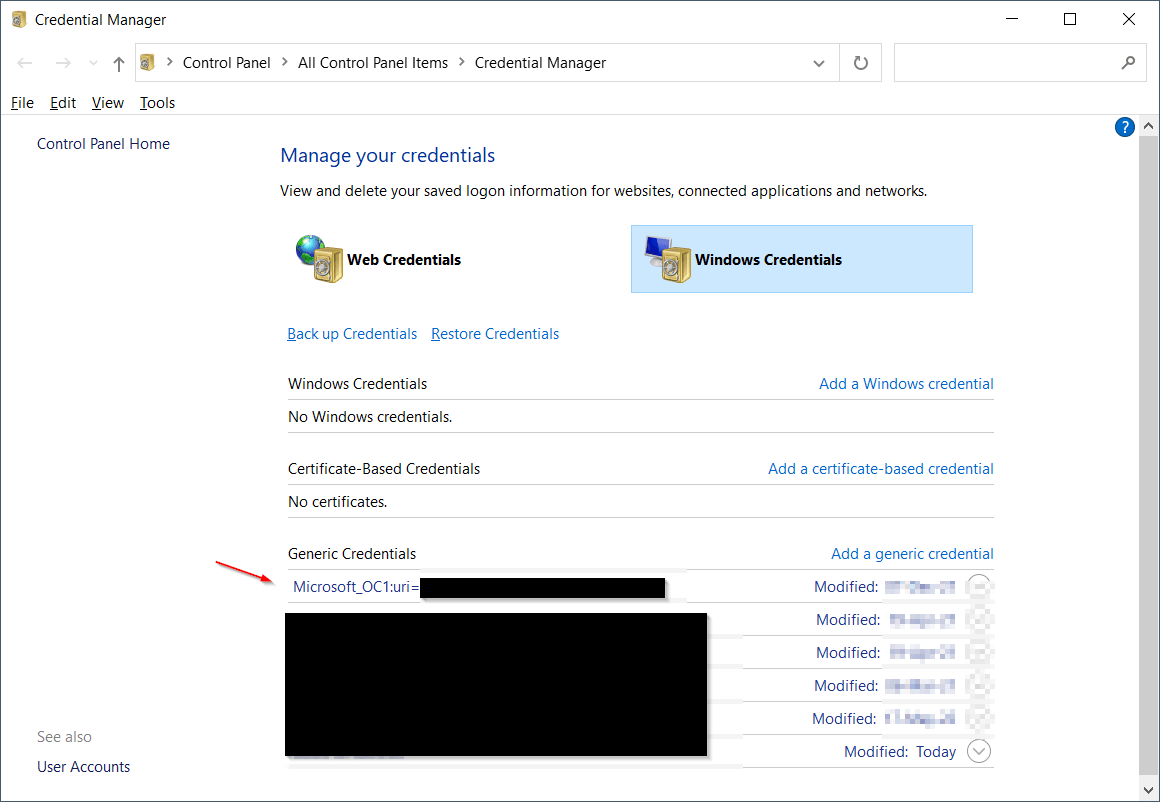
The first step for removing a saved Skype for Business password in Windows, is to navigate to Windows Credential Manager, and then select “Windows Credentials”.
From there, you will be able to locate an entry that begins with “Microsoft_OC1:” and includes as URI your Skype for Business username (typically, your email address).
For example, such an entry would be: Microsoft_OC1:uri=user1@example.com…
After you make sure that the entry is the one created for your Skype for Business credentials, you can then remove this entry.
Step 2: Manage User Certificates
Along with the Windows credentials entry, Windows also creates a user certificate based on your Skype for Business account on the specific Windows computer.
To this end, the next step, is to navigate to “Manage user certificates” on Windows, and from there, navigate to “Personal” and then “Certificates” and locate the certificate created for your Skype for Business credentials.
You can confirm the the certificate is the one created for your Skype for Business credentials, by checking the “Issued To” and “Issued By” columns.
For example, the “Issued To” column, should display your Skype for Business username (i.e. user1@example.com), and the “Issued By” column, should display “Communications Server”.
After making sure that you have located the correct certificate, the action to be taken is to delete the certificate.
Step 3: Restart Computer and Check Skype for Business
The next step, is to restart the computer and check if Skype for Business logs you in or not.
If it does not log you in and requires a password, that means that Steps 1 and 2 did the job.
In a different case, you can try Step 4, which involves editing the Windows Registry.
However, only proceed to Step 4 if you really know what you are doing, since messing around with Windows Registry, can cause issues with Windows or any other programs.
Also, it is always a good idea to backup the registry folder and entry prior to applying any changes.
You can backup specific Windows registry folders and entries in Windows Registry Editor, by right-clicking on them and selecting “Export”.
Step 4: Windows Registry
As mentioned above, this is an optional step, and you should be very careful when making changes in Windows Registry.
So, within Windows Registry Editor, you navigate to “HKEY_CURRENT_USER”, then “SOFTWARE”, “Microsoft”, “Office”, and then you must select the respective folder of the office/Lync (Skype for Business) version that you are using.
For example, if you are using Skype for Business (Lync) under Microsoft Office 2016, then you would need to navigate to the “16.0” folder and finally navigate to the “Lync” folder.
So, based on the above example, where I’m using Skype for Business with Microsoft Office 2016, the full registry path would be:
HKEY_CURRENT_USER --> SOFTWARE --> Microsoft --> Office --> 16.0 --> Lync
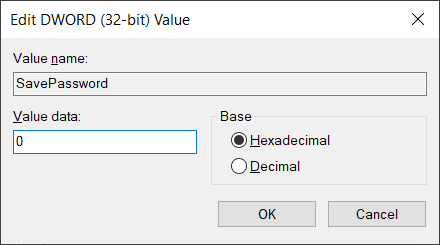
Then within the above folder in Registry Editor, you can find the “SavePassword” key, then double-click on it and modify the value to 0 as per the below example:
Recommended Online Courses:
- SQL Server 2022: What’s New – New and Enhanced Features
- Introduction to Azure Database for MySQL
- Working with Python on Windows and SQL Server Databases
- Boost SQL Server Database Performance with In-Memory OLTP
- Introduction to Azure SQL Database for Beginners
- Essential SQL Server Administration Tips
- SQL Server Fundamentals – SQL Database for Beginners
- Essential SQL Server Development Tips for SQL Developers
- Introduction to Computer Programming for Beginners
- .NET Programming for Beginners – Windows Forms with C#
- SQL Server 2019: What’s New – New and Enhanced Features
- Entity Framework: Getting Started – Complete Beginners Guide
- A Guide on How to Start and Monetize a Successful Blog
- Data Management for Beginners – Main Principles
Read Also:
- Why Enforcing Regular Password Expiration is a Bad Practice
- What is FinTech?
- How to Write a “Hello World” App in Visual C++
- How to Write a “Hello World” App in C#
- Why Enforcing Regular Password Expiration is a Bad Practice
- How to Get Started with SQL Server – First Steps
- Benefits of Primary Keys in Database Tables
- How to Rebuild All Indexes Online for a SQL Server Database
- How To Show “This PC” Icon on Windows 10 Desktop
- What is the Internet of Things (IoT)?
- How To Show Hidden Files in Windows 10
- What is a Permalink?
- Permalink Structures in WordPress
- How do you Display Code Snippets in Microsoft Word?
- Using Dynamic Memory Allocation in Java
Reference: {essentialDevTips.com} (https://www.essentialdevtips.com/)
© essentialDevTips.com
Rate this article:
Artemakis Artemiou is a Senior SQL Server Architect, Author, a 9 Times Microsoft Data Platform MVP (2009-2018). He has over 15 years of experience in the IT industry in various roles. Artemakis is the founder of SQLNetHub and {essentialDevTips.com}. Artemakis is the creator of the well-known software tools Snippets Generator and DBA Security Advisor. Also, he is the author of many eBooks on SQL Server. Artemakis currently serves as the President of the Cyprus .NET User Group (CDNUG) and the International .NET Association Country Leader for Cyprus (INETA). Moreover, Artemakis teaches on Udemy, you can check his courses here.


